


The Ultimate Guide To Setting Up Your First Mailchimp Newsletter in 2024


Table of Contents


When it comes to the most important marketing tools, email is still on top of the list. It is a direct communication channel to connect with the potential audience in a quick and priceless manner.
However, with today’s fierce competition, several email marketing providers are competing with each other to lead the race. One of these companies is called ‘MailChimp.’ This amazing email marketing software provides FREE service up to 2,000 subscribers!
Yes, you read it right- it’s 2,000 SUBSCRIBERS!
Before discussing our main topic, let’s talk about what is MailChimp is.
MailChimp – What is it?
MailChimp is a software that gives you an ability to manage and create newsletters, mailing lists and more. In short, it gives you a complete control over your email marketing campaign from start to finish.
Compared to its competitors, MailChimp offers several advantages that make it a top choice for businesses that are looking to learn every aspect of their email marketing campaign. This ultimate email marketing software (EMS) gives you a plethora of options for easy designing, sending, and saving your email templates.
Why MailChimp?
If you have this question in mind, you are not alone. When there are so many competitors offering top-notch email marketing services, why you should go with MailChimp?
Let’s know the answers-
It is FREE for up to 2k subscribers (As mentioned above) and 12k monthly emails.
-Trusted by more than 7 million users.
-It integrates well with WordPress.
-Easy to use.
-Extraordinary User Experience.
-You can create HTML email templates without the NEED for coding.
Now, let’s get to the main question-
How to Set Up Your First Mailchimp Newsletter in 2023?
Let’s get started…
Before you start setting up your first MailChimp Newsletter, look for the theme/content that you want to promote in your newsletter. Let’s say, your business has a blog section where you often update the latest blogs, so in your newsletter, you need to highlight the most popular article(s). The newsletter is also an excellent medium to communicate important information about your business to your users.
For instance, you can talk about something important to grab the attention of
your customers or clients.
1. Signing up for MailChimp Steps
Step 1: Create MailChimp Account
If you don’t have a MailChimp account, click on the website MailChimp.com and sign up of free. Provide your email address, name and create a new password.
See the image below:
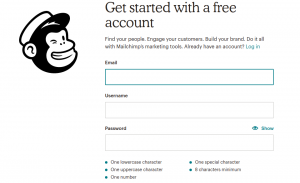
Step 2: Fill your username and password
Now after filling your username and password, click on ‘Create My Account’. Don’t forget to agree on the MailChimp’s terms. The most important thing you should take a note is – By agreeing to Anti-spam Policy & Terms of Use, you are giving the right to the MailChimp to see and review your emails.
After filling your details, you’ll receive an email from MailChimp to confirm your details. Click on the link ‘ Account Activation’ and confirm your email address. You will be asked to enter reCAPTCHA Phrase to prove if you are a spammer or human. Do it carefully!
Step 3: Fill in the details
After logging into the page, start with entering your username and password. Then, you will be asked to fill your physical address; after, click on continue. You will be also be asked to fill your website’s and industry’s details. Specify appropriately.
Now, MailChimp will visit your site and create a color palette for your newsletter automatically. When you enter the details of your industry, it will allow you to see how your newsletter is performing compared to other competitors.
Step 4: Understand the Jargon and lingo
Before using MailChimp, it is important to understand the lingo and jargon used in MailChimp. For instance:
‘Templates’ are your email designs/
‘Form’ is where users sign up to your website’s email list/
‘List’ is a group of people/
Campaign is when you send out an email to your list/
2.How to Get Subscribers?
Step 1: Make a list
You need to create a subscribers list on the dashboard, prior to creating a form on your website. Click on “Create a List” on the dashboard of MailChimp. You will now be requested to fill in information about your list.
While you are choosing whom you want to send your emails to, you must make use of the “List Name” option in MailChimp. But you are just collecting one list of emails name is not much important. Instead, you can choose “Client Newsletter.”
*Now you will see “Default from Name” in the inbox that is visible
to everyone on the list who receives the email.
*If someone clicks on reply to the email you’ve sent, such emails
will be sent to “Default Reply.”
*It’s very important to remind someone how they got on your list.
Such reminders will appear below the emails you’ve sent. A perfect example for this is, “you are getting this email because you registered on our website.”
Re-check that the address of the company is accurate, after filling the information. You can even choose to get updates in the “Notifications” section, whenever you have a new subscriber. There is also another option available, where you get to choose that subscribers can either opt between plain text or HTML emails. It is best to not click on that option as it might make things complicated for the users.
After going through the entire process, click on “Save.”
Step 2: Generate a sign-up form
Now go back again to MailChimp Dashboard and click on Lists that you will find as a third option in the top menu. Next, click on the green button
“Design Sign Up Forms,” it is on the column in the right-hand side. Sign-up form can be constructed in the following two stages.
#1. Built It Stage:
In this stage, you can opt for the components you want to add in your form, like phone number, email-address, zip-code, name, etc. You can easily move and drop the elements that you want to add.
Note: if you include fewer elements, more people will register.
#2. Design It Stage:
In this stage, you can opt from a variety of colors available. Always remember, that the color of your background should not overpower your website.
Step 3: Share your Sign-up form
So, once you are done with the above steps, it’s time to share it with people. So, click on “Share It” tab in MailChimp’s create forms.
You will see a Subscribe form URL on the right-hand side. Share your URL now on your social media accounts. Now whosoever clicks on that specific URL will be directed to your sign up form.
On the left-hand side, you will see an option to Create Form HTML. Here you can create a sign-up form on your website’s sidebar. Now click on Grey button that says – “Create HTML Code for a small subscribe form.”
After clicking on it, you will be directed to a page where you can choose the type of form you are looking for like Naked, Super Slim and Classic. Just click on the options button and change the form’s title. You can also choose a default title like ‘Subscribe to the mailing list.’
The next step is to click on the ‘Create Embed Code’. Here, you just need to copy and paste the code appearing into your blog’s sidebar widget.
This step provides permission to people who want to sign-up to your email newsletter. After you get a few subscribers, you can send your first email.
3.Start Sending Your First Email
So, now the question is how to send your first email? Well, you just need to follow a few steps. Let’s have a look.
Step 1– Start Campaign
Go to the Campaigns page on the MailChimp dashboard which is at the second place on the top menu. Now click on the red button to “Create Campaign” and choose “Regular OI’ Campaign.”
After clicking on it, you will be asked to pick a list you want to send campaign to. Now select your list and click on “Next Step.”
Step 2– Give a name to your campaign
This is the most essential steps especially when you are sending a monthly newsletter to your subscribers. It can be October 2023 Newsletter or something specific. Then you will be asked to provide an email subject that your subscribers can see. Write a catchy subject line to entice your subscribers. Select all the remaining options and personalize the options like track clicks, track opens, and field.
Now move to the next step…
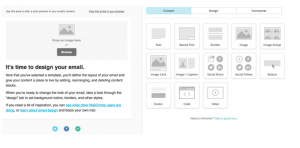
Step 3– Pick a template
Now it’s time to pick a template. You will be provided with an assortment of options for designing your email template. If you are using drag and drop editor, you can even create your own design.
Step 4– Write an impressive Newsletter
Here comes the second last and the most important step- writing an impressive newsletter. Using MailChimp’s editor is pretty simple. Double click on the edit option. After you have written an impressive newsletter, MailChimp’s editor gives you an option to edit it. If you have provided an option to your subscribers to receive plain text emails, make sure it looks refined and easy. After checking it, click on the NEXT option.
Step 5– Send it!
You have two options either send your email immediately or schedule when you want to send it.
To know how your campaign is doing, you can click on the ‘Reports’ page on the dashboard of MailChimp.
Setting up a MailChimp newsletter is not rocket science. There are just a few steps to follow to easily create a newsletter and keep a close eye on your email campaign. I hope this tutorial is helpful for you and you will understand how to set up your first MailChimp Newsletter.
Over to you…


